Search This Blog

Sunday, November 18, 2012

Copycat Burton Womens Trailblaze Top (sincerest form of flattery)

From the moment I spied this on Pinterest, I whispered "You will be mine, oh yes, you will be mine."  I love cowl necks, and I love flannel, but never the two shall meet?  But they did!


I rarely make clothing for myself anymore, as I find kids way more interesting.  But since this can no longer be found, I knew it was up to me to make it happen.

Here it is, my knockoff of the Burton Womens Trailblaze Top!
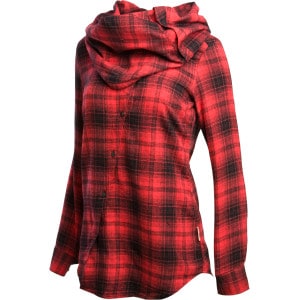
Knockoff Copycat Burton Womens Trailblaze Top

My creative process involves thinking for a day, dreaming about it at night, then drawing it out, then thinking another day.  Can't rush this stuff!  Made a mock-up muslin, found it fit, then found some flannel I loved and started cutting.  This top involves 2 yards of nice flannel, thread, 12 snaps, some interfacing, and a pattern.

Here's the deal: I want to share the love, but don't know if there is any interest.  If there is, I'll make up a tutorial and a pattern for this very comfy top.  Just comment your interest or email me with what you would like to see happen.  Otherwise, I'm just standing here by the beach in November, showing you something I made and love!  Happy November everybody, and much love :)


cowl neck flannel (yes, it can be a hood!)


cowl neck flannel shirt like the Burton Trailblaze Top
copycat Burton Trailblaze shirt

Sunday, October 21, 2012

Little Red Holiday Dress 2T-ish

linen tablecloth repurposed dress

Oh, sewing....my first love!  I so enjoy the beginning, the middle, the finished product "end"! Love it all.
A tiny linen tablecloth, but that embroidery caught my eye.   Great thrift store find!  And so, the beginning....


 Now, I love the pillowcase dress, and it has been a crowd-pleaser for sure, so I kept in in mind while thinking about what to do with such a neat find. As the season dictates, longer sleeves are appropriate, and this one had just the right amount to satisfy both the dress length and sleeves.  Bonus! 


I cut off the top of the tablecloth for the sleeves, after measuring to make sure the length of the dress would be enough..

The front needed something, so I found a bit of plaid from my stash and made it the center front.
To make the raglan-style sleeves, I just cut diagonally on the corners of the dress body and the sleeves.  After attaching the sleeves to the body, I cut a slight curve in the top of the sleeve.


Found some vintage bias tape I had picked up at Burley Park a few years ago and applied, then pulled a length of elastic through the casing.


The sleeves were a bit too long, so I added a length of elastic inside near the elbows, giving the upper arm area a little bit of a pouf. 

The fabric is linen, possibly a cotton blend, and it would be perfect for a party or play!  Can be found at Kindel & Company, marked at $24.  Stay tuned and look for tshirt-lined sweaters coming up soon as well.  Love and peace to all of you, my friends!

Friday, October 19, 2012

I made mascara! Eurekaaa...aaaa...eeeeh??? Maybe.

Yes, I still sew.  But I have side projects and ideas and DIY ADD that need attention.

Since I started repurposing fabric like it's my job, it has made me think way outside the box and the big box stores.  You can make that?  Really?  What the stink!?!  It has opened up possibilities beyond  sewing and the kitchen (four years ago, I was smug thinking I knew how to make taco seasoning packets from scratch... I like humble beginnings).

What else can a person make if they are so inclined?

I'm so inclined.

So beauty stuff got really interesting.  One site in particular has me in awe and keeps me inspired....www.crunchybetty.com.  Great reading, great recipes and inspiration abounding.  She has a book, "Food on Your Face", which is on my Christmas list.  I don't mean to gush, but you know how some people admire actors and celebrities?  Bloggers are my celebrities!  I love that talented people take the time to write and share their abilities and their genius.  I have a lineup of bookmarks at the top of my browser of my favorite blogs so I can get there really quick-like.  Because of ideas from blogs, I'm fascinated by what I can pass in the HBC aisle these days .  Fun fact about me: I have been shampoo-free for 3 years now.  You can back away quickly when you hear this, but it's true, and I'm not filthy.  Didn't know it was feasible, and I can't fathom going back.  But I digress....

There was once a day when I wouldn't leave the house/dorm room/apartment/camper without "my face".  I'm far less concerned about it in recent years, but it is still nice to have the option.  I vowed at one point that I would never be so poor that I couldn't purchase mascara.  I have blonde eyelashes, so that leads to questions about my health and well-being when I appear washed out due to lack of mascara.  However, I worry about putting scary chemicals so close to my eyes, and I remember the old myth about bat guano as an ingredient.....

And.....google it as fast as my stubby little fingers can manage.  After perusing for a bit, one concoction caught my attention:  Aloe vera gel and activated charcoal.  Hey! I have that!

Trial and (messy) error, I got a good consistency.  So I mixed up a batch and put it in a jar.  The next day, it was watery and had a grey goo covering it.  Sick.  I tried it again with a super-clean, steamy jar.  Again, next day, gross gloop.  Necessary to make one batch at a time?  Makes it pretty tempting to go with store-bought or skip it altogether, and I'm over the top, freaky weird about not giving up on homemade.  And at last....I have it!

Ta-da!  DIY, homemade mascara!
In a cute little jar, combine....
1 teaspoon activated charcoal
1 teaspoon aloe vera gel
1 pinch salt


Mix thoroughly but carefully, it can get messy.  Scoop out a bit onto your palm and use an old mascara wand to apply.  When ready to apply the next day, if it is a little dry, scoop a little onto your hand and add a drop of aloe vera gel and mix. 


In conclusion:
It has now lasted me 4 days, sans grey flora.  It takes an extra minute to prepare compared to store-bought, but it isn't about the 60 seconds of inconvenience for a granola-phile like myself.  My lashes look nice, and I'm convinced that are longer since I've started using this recipe.  Like so long they are almost tangled and need to be combed.  If anybody tries this, will you comment on eyelash growth?  It might just be wishful thinking, so I'd like some other opinions.  I would also love to hear about your DIY stuff if you'd like to share, so do feel free to comment.  Check out www.crunchybetty.com if you want more ideas about changing up your routine.


Now back to my sewing machine.  Halloween is just around the corner and I have costumes to make.
http://doodahkids.blogspot.com/2012/10/i-made-mascara-eurekaaaaaaaeeeeh-maybe.html

Sunday, September 30, 2012

Frankensweater with an embroidered Cute Possum (because they really aren't very cute in person)

Damian needed a sweater, and since I had a couple of moth-eaten wool sweaters, let the sewing begin!  I offset the button placket to the right because I thought it would look interesting, used mismatched buttons from my mom's button jar, and lined it with an old t-shirt so it wouldn't be itchy.  Since I've never seen a cute possum, I decided to be cheeky and make one up!  I embroidered around some scraps of felt, securing my felt possum to a scrap of cotton, then used a fancy stitch on my machine to create the border and secure it to the sweater.


My little bubby boy loves it!

P.S. if you like Cute Possum, do feel free to vote for #30 at http://www.inlinkz.com/wpview.php?id=190090
www.prudentbaby.com is running an awesome contest to win a new sewing machine that I've been drooling over for months.  Peace, love, and recycle!

Sunday, September 9, 2012

Quick and Easy....Pillowcase Diaper Clutch with Changing Pad TUTORIAL!

At last! Two months have elapsed since last posting....I think I fell into the blogging abyss!  Have been sewing up a small storm, but remember as I'm finishing up a hem, "Oh yeah....I have a blog that could use some updating.  Huh.  Well, since I'm almost done and didn't take any pictures, I guess I'll wait until the next one."  Repeat times ten or twelve.  What is my haste?

Pillowcase dresses, my friends!  I am so fortunate that I'm getting requests!  Yes, requests!  Thank you to my loyal Doodah fans for your support.  Pillowcase dresses are selling like crazy, despite the change of season quickly approaching. And why wouldn't they?  They make wonderful shower gifts for the giver who is thinking a year or two down the road. 

So there I was.  Gazing down at a beautiful petal pink floral vintage pillowcase I just scored at a thrift store.  I have been wanting to cut into it for a week, and now it's time.  Oh, but I should make that shower gift that I need for the shower we are attending....TOMORROW.  Planning isn't my strong suit.  This isn't the worst planning I've done.  I'm not late to the shower, pulling pins and clipping threads while driving.  But still, it is tomorrow.  But the pretty pink pillowcase is tempting me.  Dilemma.  I'm staring at the pillowcase.  And then...*hallelujah chorus*

What about a pillowcase diaper clutch?  Can I?  Will it work?  I'm in a bit of a time crunch, but my uber-supportive husband say "go", and right then and there, I'm going to make up something new, do a tutorial, make a gift and use that beautiful pink pillowcase.

My first tutorial!!!!  Away we go....

The Quick and Easy Pillowcase Diaper Clutch with Changing Pad

*makes a great last-minute baby shower gift!*


Materials:
1 pillowcase, and for the measurements in this tutorial, I used a 31 1/2 inch by 19 1/2 inch pillowcase.
19 inch by 4 inch strip of contrast fabric. 
1 snap closure, magnetic or otherwise, your choice. 
19 inch by 19 inch square of batting. 
Thread, iron, yardstick, fabric marker, machine, and the accoutrement of sewing.

1.  Press your pillowcase so it is wrinkle-free.  Lay it out in front of you.  The opening is at the right, the short, closed end on the left, the long seam is at the top, and what you are looking at will be the inside of the clutch.

2.  Mark your pillowcase with straight lines A through E as illustrated above.    Make two "x" marks where indicated, and transfer them to the other side of the pillowcase, which we will now refer to as the outside of the clutch. 

3.  Next, slide the batting inside the pillowcase and move it to the very end, smoothing it out and using a few pins to hold it in place on edges and corners.  No image or illustration here.  Ensure that it is smooth and not lumpy or shifted inside the pillowcase. 


4.  Starting at the top, stitch the length of line C, then line B, using a straight seam. Or a fancy-schmancy decorative stitch.  Whatever you like.  Starting at the top where the original pillowcase seam is preferable to ending there, as  the seam could shift.


5.  Turn pillowcase over so you are looking at the outside.  Set half your snap on the X between C and D.  You can go through all layers of pillowcase; it won't show anyway.


6.  Turn again so you are looking at the inside.  Fold the opening of the pillowcase along line D so the opening edge meets line C.  Press the fold.  Pin in place with a few pins toward the center.


7.  Stitch the length of lines E and A.  Stitch the side ends closed, forming the two pockets for the diapers and wipes.  Reinforce the ends of your seams with extra back stitching or a tiny, short zigzag.  The body of the clutch is almost done! 

Just one more little detail...


8.  Make a tab to hold your clutch closed.  On your contrasting fabric, right side, set the other portion of the snap at the end, maybe an inch or so from the end.


 Right sides together, fold in half so you have a 9 1/2 x 4 inch rectangle.  Using a 1/2 inch seam allowance, stitch both longer sides, leaving the short end open. 


Turn right side out and press.

Fold under a half inch at the open end near the snap and press, closing up the tab. Stitch end closed.


 9. On the outside of the changing pad portion, find your X located between lines A and B. With the snap facing down, place the fold portion of the tab on the X so the snap end is crossing line A and the snap is nearer to the left side of the pillowcase. Pin in place. Fold clutch to make sure it is correctly placed and reposition if necessary. Stitch yourself a little square on the tab covering the X, thereby attaching the tab to the pillowcase. If you are feeling frisky and fun and have fonts, go crazy on the tab portion covering the X and put names or word, or use cute stitches to make your square. It will be on the outside so use your imagination!


10.  Fold along line E, then along line A, then fold along the space between B and C.  Snap tab in place.  Admire your work.  Unfold, place a diaper or two in one pocket, a case of wipes in the other.  Refold and give to a wonderful mama to place in her purse for those times when going into a store for just a sec and doesn't want the whole diaper bag. 


*yay!*


My first tutorial!  How did I do?  Was it clear?  What can I do to improve?  Hope you find it useful.  :)

Thanks to www.diagramly.ly for the easy to use diagram software! 


Wednesday, July 11, 2012

and now....the exciting conclusion (warning: excitement levels may vary)

When we last visited the boring baby blue shirt, plain and tall, it was not what I would tag and call my own.  Bulky finished edges, kinda roomy through the back.  Yeah.  So I trimmed the yellow and pink nightgown-turned-bias-tape at the seam....

folded the excess down on the front and stitched a straight seam on the back, securing it in place....

then trimmed it right up next to the seam, leaving a raw edge with the yellow and pink knit.  When you tend toward bohemian and upcycled style, you can do this!  It isn't fussy, it is cute and fun!

I also put a few pleats in the back to take up the extra fabric and provide a slimmer fit.  Adds a bit of interest, too.

Would pockets make it too busy?  I can't decide.  I haven't put it in the store yet, so pockets might make a great sequel.  Whaddya think?  Should I add some pockets?