Search This Blog

Showing posts with label free pattern. Show all posts

Friday, November 29, 2013

Santa Baby! Easy 4-seam Santa hat FREE pattern/tutorial


Last year, I had the distinct pleasure of making Santa hats for the preschool program.  The hats were a huge hit!  Some of the hats are still being worn....like around my house.  Why wouldn't a person simply hit the dollar store for Santa hats, especially 20 of them?  For starters, they are felt and poor quality, in my opinion.  Second of all, it's more cost effective to make them, especially a couple dozen.  Beyond that, this is what I do!  And with an easy-peasy pattern like this, it would have taken me far longer to drive to the store.

While making a few for the store this season, it was brought to my attention that a free pattern and tutorial would be nice.  Say no more!  If you want to make just one or dozens, here is the pattern for you.  I made it all so nice and simple, so very little sewing prowess is needed.  That means YOU, you brave little novices out there!  You can so do this!


Hat fits a 19-22 inch head.

For one hat, you will need:
1/2 yard red fleece
1/8 yard white fleece
1 white pom pom
white thread

IF YOU ARE PLANNING TO MAKE UP TO 6 HATS, BUY 3/4 YARD OF RED FLEECE FABRIC AND 1/4 YARD OF WHITE FLEECE FABRIC.  INSTRUCTIONS FOR CUTTING OUT MANY HATS IN THE NEXT POST.

Print out the 3 page pattern here.

*note* do whatever your printer needs to do to make sure there are no margins.  Either uncheck "fit to page" or pull down the menu for "no margins".  Anyway, ensure there are no margins.

Match arrows and tape according to pattern.  Cut out pattern.

My favorite method for cutting out the fabric is to lay out the pattern on the fabric, weight it down with canned goods or weights, then trace around pattern with the kids' washable markers.  See the STRETCH arrows?  Be mindful of the stretch of the fabric going with the stretch orientation on the pattern.  Cut inside marker lines.  Remember, align the FOLD arrow  of the pattern on the fabric fold.  Do the same for the hat band on the white fleece, laying it out on the fold, tracing and cutting inside lines.

Two pieces.

OK, let's do our 4 seams.  Ready?

Using a straight (8-10 stitches per inch) stitch or a serger, and a 1/4 inch seam allowance, stitch the body of the hat, right sides to the inside, as shown, in one seam.  If using a straight stitch, drop your needle at the angle and pivot slightly.  If serging, just curve around.  There it is....seam number one.


Next, grab the white hat band and stitch the short ends together, right sides inside.  That was seam number two.


Slide the hat band over the body of the hat so the bottom edges of both are lined up and the seams are matched.


Stitch that bottom edge all the way around, 1/4 inch seam allowance.  Thus, your third seam.


Turn the body of the hat right side out.


Turn the band up at the seam; adjust and finger-press the seam.  If you would feel more comfortable, pin the band in place.


Time for that fourth seam!  Stitch the band to the body at the edge of the band, securing it to the hat body.  A zig-zag stitch is nice, but a straight stitch done 1/4 inch from the edge of the band is good, too.

Four seams! Done!

Hand stitch that pom pom to the end, maybe add a jingle bell.


Who is feeling a bit festive?


Coming up......when you need a bunch of Santa hats......instructions for making this multiply.  Just kidding....you don't have to wait!  Here it is!


Wednesday, March 27, 2013

Easter Bunny Hat*free pattern/tutorial*....and recycling a former post!

bunny hat with ears

Easter sneaked up on me this year.....or that is what I always claim!  Truth is, I'm just not a great planner.  So when the notion to make a bunny hat struck me this morning, I wondered how I could get it up on my blog fast enough!  Duh!  Let's use an existing pattern and modify it for the season!

See the pattern and instructions for Adventure Time Finn Hat.  When you print out the Finn Hat pattern, print out the  Bunny Ears.  I marked the x and o the same on the bunny ears as I did the short ears on the Finn hat, so place them just the same way.


Before you follow the instructions for the hat, get out your glue gun and plug it in.  Take two of your bunny ear pieces and lay a few long lines of glue the length of each ear, beginning an inch from the top and ending two inches from the bottom.  ALLOW TO DRY THOROUGHLY.  Put it in the freezer, if you must!
Several rows of glue running down the length of an ear piece.

Stitch a glue-covered ear to a plain ear, glue side out, all the way around, pivoting at the ear point.  Leave the short, straight bottom edge open.  Turn ear so glue is inside.  And there you have a free-standing ear!  Repeat with other ear.  

Of course, for more of a floppy look, feel free to omit the glue.  Or stuff it with some batting.  However you like your bunny ears, it is your hat!  


Follow the step by step Finn hat instructions.  Find yourself some bunny to love!
Awesome Bunny!
Baby Bunny!
my Xander-bunny

Thanks to Mandy at www.mgtotshots.com for your excellent photography skills!  Much love~

Saturday, December 8, 2012

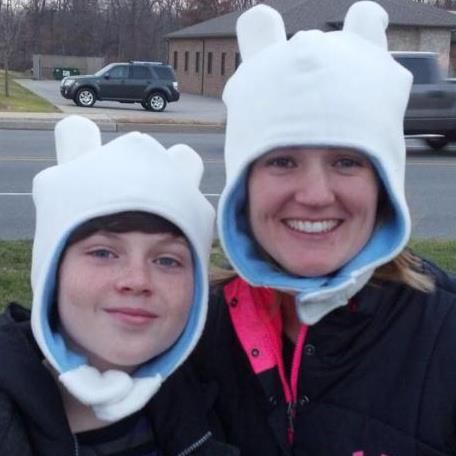
Adventure Time Finn Hat *free sewing pattern and tutorial* White Hat with Ears

Adventure Time, c'mon grab your friends....


I like cartoons, and I really enjoy having kids so I have a good excuse to watch cartoons. Once in awhile, a cartoon comes along that we all can enjoy, and it has occurred and is on Cartoon Network.  It's weird, it's funny, it's sometimes creepy, it's got adult moments without being too salty.  


But enough about my feelings, you are probably here for the hat, which is not unlike the one adorning the human living in Ooo.

This pattern fits about a 19-21 inch head, because of the stretch of the fleece.  


For the free pattern, click here or copy this URL and paste it in your browser.

https://docs.google.com/file/d/0Bzr8dMgZCJipU3gzX1RiN1BmQ2M/edit?usp=sharing

(when you print, be sure that the check mark for the "fit to page" is UN-checked)
This is my first pattern I've made to share, so please be patient!


DIFFICULTY LEVEL: easy peasy.  I am going to use overly explanatory explanations for the nervous beginners because you guys rock for trying something new.  If you need information on sewing with fleece, check out http://coatsandclarksewingsecrets.blogspot.com/2012/01/sewing-on-fleece.html  

TIME NEEDED TO COMPLETE: one hour, but don't be angry with me if I'm wrong.  It really depends on skill level and if you have children.


MATERIALS:You will need a half yard of white fleece.  If you want a contrasting lining, get a half yard of fleece in your choice of color.  Check to see that they stretch about the same.  Oh, and white thread and your choice of closure, i.e. Velcro, large snap closure.  


When you lay out your pattern on the fleece, check to make sure it will stretch in the direction indicated.  Use weights or canned goods to hold pattern in place.


 Trace around your pattern with a washable marker onto the fleece, then cut just inside the marker lines.  Mark the Xs and Os with your marker on both sides of fabric.


Traced pattern


cut just inside your marker lines

 Repeat, cutting the contrast/lining, omitting the "ears".


Your hat and ears and lining.


I use a straight stitch set at 3.0 for this project.  You can do that or use a zigzag stitch.  I don't care, I'm not the sewing police.


Sewing instructions are as follows:


1.  Make your "ears" by sewing two together, right sides together and using a half inch seam allowance, then turning,.  


2.  Lay your hat out flat with right side up.  Position "ears" x and o over x and o on hat, then fold hat, right sides together, as shown. Your "ears" will be sandwiched in with all x's and o's matching.  Pin in place.  Starting at top of the point on the hat, stitch down the edge, catching in the "ears", using a half inch seam allowance.  Repeat on the other side.  You will now have two points.


3.  Pin remaining raw edges of hat, right sides together, and stitch through curve and down to the bottom, as shown.


4.  Lay your contrast/lining out flat with right side up and fold hat as you did in step two with the hat, omitting the part about the ears.  Starting at the top of the point, stitch down the edge; repeat on the other side.  Two points.


5.  Pin remaining raw edges of contrast/lining , right sides together, and stitch through the curve and down to the bottom as you did with the hat.


6.  You can admire your hat and your contrast/lining, which looks strikingly similar hopefully.  Enough admiring, back to work.  


With right sides together, place the lining over the hat and pin so the back of the hat seams match up.


7.  Stitch raw edges together, leaving the bottom portions open for turning.


8.  Turn, pulling through the opening so right sides are out.  Adjust and stretch a bit around the hat so it looks nice and no contrast peeks out.


9.  Tuck in the bottom flap raw edges about an inch and pin in place.


10.  Top stitch a half inch around the entire hat, closing up the bottom flap edges.


11.  Put a closure on the flaps:  many prefer Velcro, I use a big snap closure.  What's your preference?


12.  Don your sweet dome piece and find your adventure.  

Thank you to one of my favorite people, Mary, and her friend Jonathan, for making this pattern look so good!

P.S. If you like this pattern, perhaps you might enjoy a bunny hat, just in time for Easter!  I use the majority of this pattern in my newest post on making a Bunny Hat!

Easter Bunny hat utilizing the Finn Hat pattern!  Find it here.


Thank you to Chelsea for her helpful post about sharing a pdf.  Find out how at http://stayingsteyn.blogspot.com/2012/01/how-to-share-pdf-in-blogger.html