Search This Blog

Thursday, May 31, 2012

Workin' shirt 6-12 months *SOLD*

It's so fun going through the donations my friends drop off!  Inspiration awaits.  A few years ago, I would have wrinkled my nose at this one and maybe harvested the buttons. 

The stains on the front show that someone was a very hard worker.  Now the back.....that is where the re purposing lies.  Since I can't find my tailor's chalk, break out the kids' washable markers and start drawing! 

The button placket resembled a bib, representing many meals, but the buttons underneath got cut out and used.


Salvaged some denim jeans to form the button placket, just need some holes.  I like the stand collar look of the original shirt, so I kept that in mind when I cut out a new one; I saved the original label on the outside, used some baby novelty scraps for the inside.


 Can you tell that I'm just making stuff up as I go along?  There's a long term plan, but it's flexible.  Note to self:  pinning ultimately saves a lot of seam ripper action.  I just get so excited to see the finished product that I try to skip pinning, then regret it and delay the moment when I get to hang it in the store!  Made some sleeves from the original sleeves, just traced the arm hole and added a seam allowance. 


Got to use the fancy schmancy font to embellish the pocket, much to my delight.  Tags, and now it is in the store SOLD!  So my new mantra is "pin even though you don't feel like it".   Thank you, Susi S., for the super-fun donation!

Tuesday, May 29, 2012

The Tough Guy Shirt 18 months

I don't want to alarm anyone, but I think I'm getting my creativity back following my dull lull!  I've been waiting for it to happen, and sure enough.  It didn't hurt to keep sewing, even though I used a pattern many times over.  At least I could play with colors and notions during the brain fog.  I've got some fun ideas in my notebook for future projects.  Currently, I have this ready to go....


Embroidered the helmet and stitched it under a junk tshirt that happened to have a cool graphic, then cut out the center so it is raw edges surrounding the helmet.  On the front, I stitched a denim pocket and a name badge.  It is 18 month size. 

I have another Tough Guy shirt that I'm putting together hopefully today. It all depends on the aimless wandering we enjoy on a sunny, nice day with no place to be.  I might have another post by the end of the week :)


Monday, May 28, 2012

Vintage fabric, vintage dress pattern....yes, please!

Rummaging through my sizable stash of fabrics and notions, I found this steel blue/floral vintage fabric that my mama kindly got rid of donated to me. 

You see, this fabric has been kicking around her house since probably the early 80s, at least as long as I can remember.  It hung out so long that fashion changed, new fabric got more attention, and....well....it is just not right for just everything, with its small flowers and obvious lines.  When I saw it last week, I finally got the "a-ha" moment; I knew what I was going to do with it!  Utilizing my pattern from earlier posts, I cut it out on the bias...


and added pockets with an elastic upper edge and gathers around the bottom.  See how easy they are?  Just pin in place!


Done!
Besides home school home ec, I have had one sewing class, and it was so enlightening!  I owe so much to my mom and her instruction, but this college class helped with a lot of the finer aspects.  For instance, finishing raw edges.  I thought that was what pinking shears were for, or a serger if you were lucky enough to have one.  But I learned a very attractive, professional finish that I applied here.
stitch an eighth inch fold on all your raw edges that will form side seams or shoulder seams
sew side and shoulder seams, half inch seam allowance, right sides together.

Press open.  Admire your nice looking finished seam.


With the advice of Christian at Kindel & Company, my unbiased arbiter of good taste, I added goldenrod to the mix...


and finished it with the lace that used to adorn every little girl's wardrobe when I was a wee one.


Vintage fabric, vintage pattern, little spicy color added.  Size 3t-4t. Hope you like it!  It will be in the store tomorrow!

Thursday, May 24, 2012

The Hippy-Dippy Sippy

And now, as a diversion from the regularly scheduled sewing.....

Due to growing concern over bottled water (I'll let others elaborate), I have eschewed the ubiquitous plastic menaces in favor of.....a glass jar with a lid.  Wow. Sexy, I know. I don't get styrofoam cups for my coffee fixx either; I have some rather attractive ceramic mugs with lids for my hot beverages. But back to my jar; it used to contain spaghetti sauce, and when the contents were gone and it was being rinsed for the recycling, I noticed it was a rather nice jar. Good size, wide mouth, measurments printed on the side. So I saved it with all the rest of the jars in my weird little jar collection in the cupboard....why do I save those things? I've been using said jar as a water bottle, but just today made its liquid refreshment readily accessible with a drill and a vinyl grommet from the hardware store.

Ta-da!  The Hippy Sippy! 
Just drilled a hole, trimmed away the sharp edges, inserted the grommet and found a bendy straw.  I had an old wool sock that I hadn't worn in years as it was itchy and had no elastic stay-up power; I cut off the foot part, pinched 4 corners to make an x and stitched.  Hence, my cup cozy that keeps me from breaking it with my carelessness as well as keeping the condensation at bay.  My Hippy Sippy with a sweater! 

Can one take Reduce/Reuse/Recycle too far?  So far, not that I have observed.  Do what you can, and I'm totally comfortable with it.  I'm not yet ready to share the other weird stuff I do in the name of recycling or preserving my health on the wide wide web!  I'll stick with sharing what I'm sewing.

Now that I've strayed into DIY territory, let's head back to the regularly irregular sewing blog!

Wednesday, May 23, 2012

Pillowcase Dresses.....revisited, not reinvented

Ah, the pillowcase dress!  Cute, abundant materials, and good for all sewing levels, just try NOT to find a plethora of images and tutorials for the pillowcase dress!  I have a great time tarting them as I see fit.  Last evening, I went past my ridiculously early bedtime making up a couple of dresses for a new friend's granddaughters. 

I attempted a tutorial on the ribbon opening in the back of the dresses, but the black fabric didn't show much detail like I had hoped.  Being that it was fun to make, I will making more post-haste, and with a lighter fabric to show the process.  Tutorial on the ribbon back in a day or two!  In the meantime, my take on the pillowcase dress....

I made a soft and silky sash to run through the casing, which ties at the middle back or at the shoulder.   Again, NOT A PHOTOGRAPHER, so I wasn't able to get a good detail of the ribbon opening in the back with the sash tied in a bow.  I hope the little girls enjoy these summery dresses!


Saturday, May 19, 2012

Owly

When I was a kid, I remember my grandma Susie asking if I was owly.  Is that a thing?  Roughly translated: are you a grumpy, whiny, tired kid?  I don't know if anyone outside my nuclear family has used that word, or if it is a very old expression that has lost its popularity.  So imagine my delight at finding.....

My kids and I really enjoy birds of all kinds, and the owl is no exception.  I've made a few owl-embellished sweaters, but with summer coming up, it's time to think about owls migrating to dresses and tshirts.

Using the "creative-lull" pattern mentioned in my last post, a yard of fabric given to me by my parents' neighbor, some scraps of wool sweaters washed in hot water (felted), bias tape from a flea market and embroidery floss from a garage sale, I got to work.  Still working out the details of what I'm doing with this blog, but in keeping with my plans, I'm really narrating the garment from it's non-fabric-store start to "upcycled" finish.


Wool sweaters make such useful little scraps!  I apply fusible interfacing so they don't stretch as I stitch.  If I ever get brave enough, I'll attempt a tutorial of some sort.  This owl was a little drawing that got cut up and wings added separately.  The blanket stitch takes a little time, but keeps him in place on the scrap of pink corduroy. 


.  
 Centered the patch then pinned in place in preparation for a  topstitch that leaves raw edges on the corduroy.....I think some raw edges give it a bit of a bohemian, interesting look.  I used a fancy schmancy stitch on from my wonderful anniversary gift sewing machine I received in November.  Mike is a thoughtful and resourceful gift-giver; I always rationalized that I didn't need a nice, new sewing machine with stitch options because I thought I would never use them, when in actuality I just hate parting with a dollar.  But Mike knew better and found me....a Brother! 
Enter Brother dearest:  I use the stitches and fonts all the time!  It was brand new, smooth, has cool little tricks and feet, and I love it.  But I digress.....

Serged the side seams so it doesn't have that unfinished look; I want to people ask if it is handmade versus stating that they can tell it is handmade.  As it is unlined, finished the neck and arms with bias tape, then serged the hem and stitched with matching thread. 


The finished dress!  Oops, forgot to mention.....the little contrasting fabric in the corner?  Yeah, when I was cutting out the dress back piece, the placement would have wasted a fair amount of fabric and I really wanted to conserve a large part of the fabric for another project.  So as an accent, I did a neat little flat felled seam to piece the original fabric to the accent fabric, and continued cutting out the piece as usual.    Recognizing that the term "pop of color" is used to the point of being tired, I hesitate.  Does the accent fabric give it a "punch" of color?  A "kick" of color?  Too violent?    Sorry. 

So there you have it....a sweet, summery, owly dress!  


Saturday, May 12, 2012

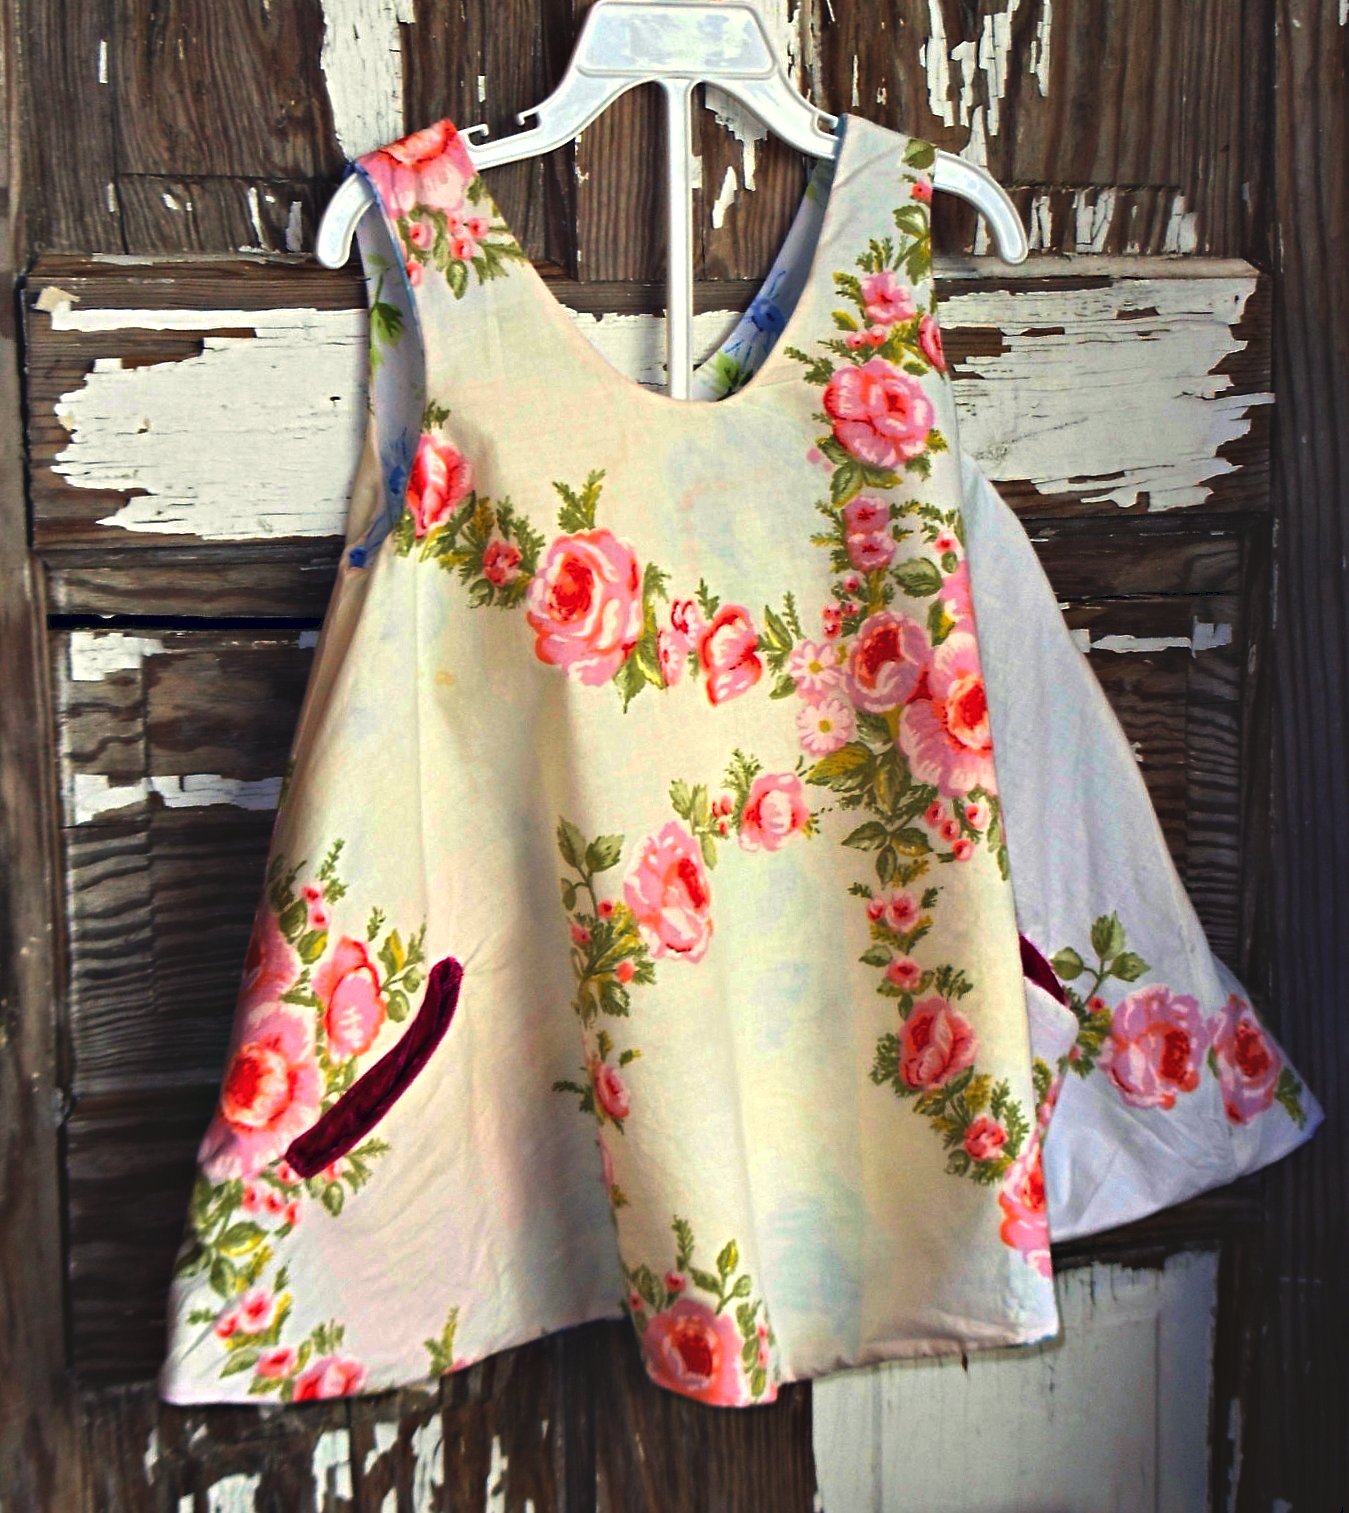
Voila! A reversible 3T-4T dress!


From humble beginnings, a flat sheet and pillowcase from a thrift store, a few scraps of velour for the welt pockets, and.....
Two pictures....one dress!
To save time, I cut out two dresses, but then decided to try something new.  Is there even a market for a reversible dress?  I don't know.  Two dresses in one seems like a good idea.  We shall see! 


The welt pockets take some practice and patience, but the finished product is quite appealing.  Burdastyle offers a great tutorial for a perfect pocket. 

I had a moment, at 9pm, which is sadly past my bedtime, when I could not for the life of me figure out what seams to sew to make it reversible.  In an effort to reduce hand stitching or the dreaded fold-and-topstitch, which never looks good or ends well with me, I couldn't think for the melatonin setting in.  Finally I settled on stitching the two front pieces together, right sides together, at arm openings, neck openings and bottoms, leaving the shoulder and side seams open.  Did the same for the back pieces.  Pulled them through so right sides faced out, then sewed front to back at side seams on the pink fabric and as far as I could on the blue.  To finish, I did a little topstitch close to the edge to join front to back on the blue fabric.  Little more involved than a regular lining as it will be showing, but did I mention you don't have to make your raw edges look beautiful when it is fully lined? 

If I lost you non-sewers two paragraphs ago, don't feel badly.  But for those of you who think, "you know, I could do that",  YOU CAN!!!!  Try a simple pullover dress, like this which is only two pattern pieces if you don't count the pockets, and you can do it!  And if you do, will you please take pictures of the finished product for me?  I love sharing success stories, or fail stories! If you aren't up to the task of a reversible dress, bias tape can be used to finish the neck and arm openings as well as the hem on a regular, unlined dress.  Prudent Baby, one of my regular stops on the wide wide world of web, offers a wonderful tutorial on working with bias tape here.   

This dress sold today!  So another one will be ready soon.